Raspberry Pi Stack – A platform for learning about IoT
During the summer of 2015, I decided to focus on learning about the ‘Internet of Things‘ (IoT) and the supporting technology. The Internet of Things will consist of lots and lots of low powered devices embedded in common household appliances and gadgets.
The area that interests me most is the communications between IoT devices and the Internet, including the APIs, encryption, protocols, and algorithms that will make IoT possible.
The programming language I am planning to use is called Go (GoLang). The beauty of Go is that it can be compiled for multiple platforms (Linux (ARM/x86), Mac, Windows, Android, and iOS) and results in a single statically compiled executable.
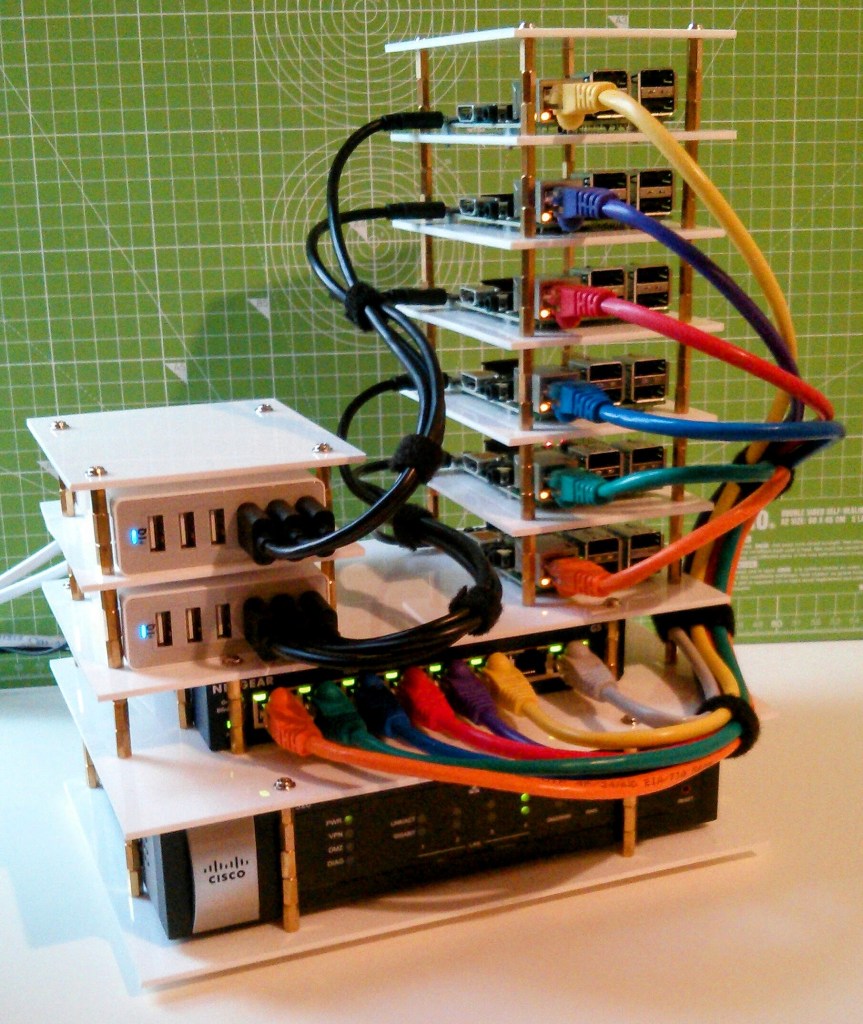
The Raspberry Pi Stack was created with the following components.
- Raspberry Pi 2 Model B Desktop (Quad Core CPU 900 MHz, 1 GB RAM, Linux)
- Samsung Memory 32GB Evo MicroSDHC UHS-I Grade 1 Class 10 Memory Card
- Anker 60W 6-Port Family-Sized Desktop USB Charger with PowerIQ
- NETGEAR GS108UK 8-Port Gigabit Ethernet Unmanaged Switch
- 50 pack Brass M3x10mm Female Screw PCB Hex Pillars Standoffs Spacers
- 50 pack 10mm Body Long M3x6mm Male Female Brass Pillar Standoff Spacer
- 50 pack PC Mounting Computer Screws M3 x 1/4in Long Standoff
- 10 pack multi coloured Cat5e cables – 0.5 meter
- 6 pack Anker® 1ft Micro USB Cables High Speed USB 2.0 A Male to Micro B Cables
- Plasticard Sheets A4 White 2.5mm
When purchasing the components, I assumed that the mounting holes on the Raspberry Pi 2 were wide enough to accept the 3mm wide screw on the standoff spacers. I was wrong, but I believe that I now have a better solution. The holes are M2.5, drilled to 2.9mm wide.
The M2.5 standoff spacers are really expensive in comparison and the multi-layer circuit board will be damaged if you try to force an M3 screw into the hole. There is actually some movement in the tower which is harmless against the plastic, but it could have eventually damaged the circuit boards if I had directly stacked the Raspberry Pis with the smaller spacers.
The single core Raspberry Pi B+ and Cisco RV320 firewall were surplus from previous projects. Although not entirely necessary, the Cisco firewall will help when I start experimenting with Docker and Kubernetes, which may require multiple networks. As the Raspberry Pi has only one network adapter, the firewall will support multiple virtual networks (VLANs) using the single network adapter. This will be better than using USB Ethernet adapters and an additional switch.
The specification of the Raspberry Pi Stack is as follows.
CPU
- ARMv7 Cortex-A7 Quad Core Processor
- 4 cores x 900MHz = 3,600MHz
- Peak Stack CPU Speed: 5 nodes x 3,600MHz = 18,000MHz
Memory
- Total: 5 nodes x 974MB = 4,870MB
- OS Usage: 5 nodes x 56MB = 280MB
- Total Usable RAM: 5 nodes x 918MB = 4,590MB
Storage
- Total MicroSD Storage: 5 nodes x 32GB = 160GB
In addition to this, the gateway node (Yellow) is a Raspberry Pi B+ with a single 700MHz ARMv6 processor core and a total memory of 482MB. This node will be used for SSH access, serving static web content, load balancer, and monitoring the stacks status. I also have two 120GB 2.5 inch USB 2.0 hard drives to add to the stack, which should be sufficient for running some MongoDB databases, etc.
I am managing the Linux operating systems using Ansible, which is an Open Source SSH based management tool. It doesn’t require a client on the nodes it manages and can execute ad hoc commands and predefined playbooks on multiple nodes.
The Raspberry Pi Stack is far from finished and will continue to grow at time goes on. The Raspberry Pi is an excellent device for adding sensors and input devices, Bluetooth adapters, Wi-Fi adapters, communicating on an I2C bus, etc. It should prove to be an interesting long-term project.
raspberry pi iot